Introduction
During my second year at university, as part of our software engineering module, myself and a team of four other students were tasked with designing and developing software for a client, which in our case was Deutsche Bank.
We were tasked with designing a prototype system that could be used to provide live audience feedback, including an estimate of the group mood/sentiment, during a presentation. In this post I'll talk about how we approached this task and how I lead backend development.
We each assigned ourselves different roles within the project, with me being the lead backend developer due to having the most experience with backend development. Because of this, I'll mainly be discussing the development of the backend, though I'll also briefly dive into the teamwork/project management side of things.
We decided to follow the Scrum software development methodology, involving choosing a 'scrum master' and having twice-weekly meetings where we discuss progress/set goals. Also, since there were three of us working on the backend, I organised an additional weekly meeting for the backend team. These meetings turned out to be incredibly helpful, keeping everyone up to date with the progress being made and making sure we stay on schedule. This wasn't traditional Scrum, however, as the format of the module necessitated that most of the planning be done upfront due to the submission of a separate 'planning and design' document early in the term. It could therefore be thought of as a waterfall/scrum hybrid.
We had a total of 9 weeks to do this project. We spent the first 4 weeks on planning and design, and the next 3 weeks developing the product. The final week was spent on testing and validation, as well as writing up our final report.
Planning and Design
We first created a list of user and system requirements, both functional and non-functional, to be signed off by the client. Each requirement was given a priority (Must-have, should-have, could-have, or won't-have) and used to guide the design of our app.
For the UI we decided to use ReactJS and we prototyped the design using Figma, an online collaborative design tool, and went through multiple iterations, settling on the current design.

We decided that rather than requiring attendees to create accounts, we would use a system where each session has a unique code that is required to join. This is because having to create an account disincentivises attendees from using the app. I have also used a similar authentication system in the past (see draw game) so know from experience that this works well.
For the backend we decided to use the Spring framework as it allowed us to easily send and receive HTTP requests over a network, and automatically serializes and deserializes JSON data.
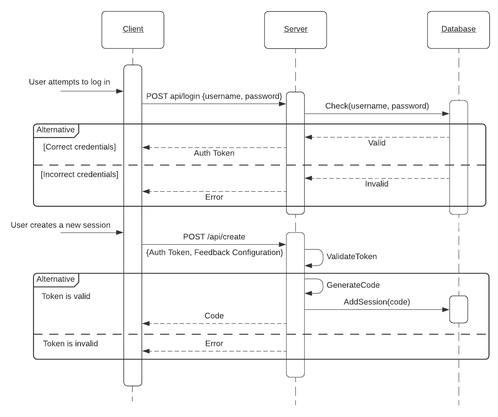
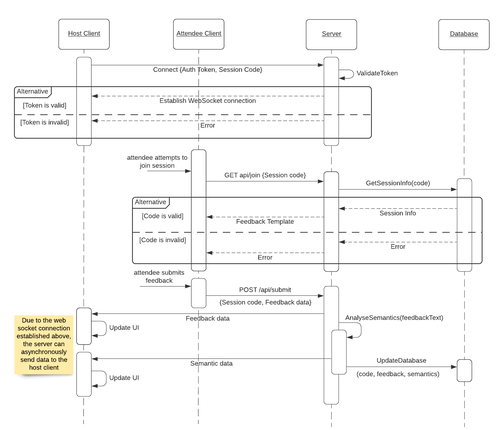
I started by planning out the different API endpoints we would need and the data that would be sent to and from each one. I also created an initial class diagram outlining the structure of the webserver, as well as some sequence diagrams demonstrating some of the core functionality. Here are a couple of example sequence diagrams I made demonstrating some of the core functionality:
To perform the sentiment analysis we decided to use Pytorch along with Hugging Faces transformers module. This runs as a separate local server using Flask, with its own API that can be called by the Spring webserver. The machine learning model we used is based on Google’s BERT model, which stands for bidirectional encoder representations from transformers. This allows contextualized embedding varying between sentences, meaning that the system understands that some words have multiple meanings, depending on the context. Using this we could get the sentiment of each piece of submitted feedback, allowing the average sentiment to be plotted over time. We could also compare the similarity of comments, letting us pick a 'top comment' by choosing the comment that most represents the audience as a whole.
Developing the Server
For source code collaboration we used Git, hosting the repository on GitHub. We used branch protection to prevent direct commits to the master branch that could potentially break the build, instead creating branches that are merged via a pull request. This pull request would then be tested using an automated workflow written by us and stored in a .yml file. If any of the tests fail, the branch cannot be merged.
The server code was split into 4 main classes:
SessionController, containing the API endpoint functionsDatabaseController, containing the database connection as well as helper functions for reading and writing to the databaseAuthenticationUtils, containing functions for handling authentication via JSON web tokensSocketController, containing functions for sending data via WebSockets
Creating API endpoints with Spring turned out to be super easy. For example, here is the code for the join endpoint:
@GetMapping("/join/{sessionCode}")
public Template join(@PathVariable String sessionCode) {
	logger.info(String.format("received request to join session %s", sessionCode));

	Template template = dbController.getSessionTemplate(sessionCode);
	if (template == null) {
		throw new ResponseStatusException(
			HttpStatus.NOT_FOUND, "session not found"
		);
	}
	return template;
}
While implementing the API I used a program called Postman to send test requests to each endpoint. Postman also lets you write automated tests in JavaScript, which was useful for integration testing. It also can generate nice looking documentation for the API automatically, which was useful for the other members of the team.
For the database we used PostgreSQL with JDBC, making use of Javas PreparedStatement class to prevent SQL injection. One of the less experienced members of the team was in charge of the database, so I provided them with support by giving them 1-on-1 help when they were unsure what to do and providing detailed doc comments for functions they needed to create.
Since the server needs to be able to send new feedback to the event organiser asynchronously, a WebSocket connection is required. Fortunately, Spring makes managing WebSocket connections fairly easy. It even has built-in support for the STOMP protocol, which uses the publish-subscribe pattern for sending and receiving messages, which is perfect for this type of application as the host client can subscribe to their session, meaning they will then receive all new feedback sent to that session.
Here is the function that publishes feedback to its corresponding session:
public void sendFeedbackToHost(Feedback feedback) {
	String sessionCode = feedback.getSessionCode();
	logger.info(String.format("Sending feedback via websocket to session `%s`", sessionCode));
	try {
		template.convertAndSend("/session/" + sessionCode, feedback);
	} catch(Exception e){
		logger.error(e.toString());
	}
}
The convertAndSend function converts the Feedback object into JSON and sends it to the address of the session.
Now the tricky part was figuring out how to add security checks to the WebSocket connections, making it so that only the host can subscribe to their session (preventing attendees from potentially being able to snoop on the messages sent by others).
Turns out the way to do this is to create an interceptor for SUBSCRIBE events that checks for an authentication token in the header, throwing an error if missing or invalid.
public class SessionSubscriptionInterceptor implements ChannelInterceptor {
	// ...
	@Override
	public Message<?> preSend(Message<?> message, MessageChannel channel) {
		StompHeaderAccessor headerAccessor = StompHeaderAccessor.wrap(message);
		if (StompCommand.SUBSCRIBE.equals(headerAccessor.getCommand())) {

			String[] destSplit = headerAccessor.getDestination().split("/");
			String sessionCode = destSplit[destSplit.length - 1];

			if (!validateUser(headerAccessor, sessionCode)) {
				throw new MessagingException("User is not the host of this session");
			}
		}
		return message;
	}

	private Boolean validateUser(StompHeaderAccessor headerAccessor, String sessionCode) {
		// ... verifying that the user is the host of this session
	}
}
Finally, we hooked up the front end to the backend and begun our testing and validation phase.
Testing and Validation
For unit testing we used the JUnit framework as it lets you easily define test cases and create assertions for testing expected results, ensuring that each component works as intended. Test cases were derived by looking at the structure of each function to ensure statement adequacy. Initially, some of the tests involving null values failed due to a null pointer exception being raised. These were then quickly fixed, resulting in a more robust codebase.
To perform integration testing I used Postman to create automated API requests that use JavaScript to validate the result. For each endpoint, I created different test cases including normal requests, malformed requests, unauthorised requests, and requesting data that doesn’t exist. Overall there were 64 test cases, all of which passed.
End Result
In the end, we had a fully functional prototype application that our client was happy with.
This project gave me valuable experience both working with a diverse team and working with a real-world client for the first time.